-
注册小程序个人账号,获取 appid
-
微信开发者工具新建项目,后端服务选择小程序云开发
-
初始化后,会提示
Error: invalid scope没有权限,请先开通云服务这时候需要点击左侧 云开发,开通云开发。首次开通云环境后,需等待大约 10 分钟方可正常使用云 API,在此期间官方后台服务正在做准备服务,在项目结构目录中
cloudfunctions后会接上你的云开发环境名称即可视为成功 -
若提示
cloud init error: Error: socket hang up可无视,可能是网速过慢,刷新重新进入即可
-
-
简单构建页面,可选择拍摄上传图片/本地相册上传图片
<view class="container"> <view class="title-container"> <text class="title">猜猜我是个啥</text> </view> <view class="btns"> <button class="btn" data-Index="0" bindtap="doUpload">拍摄</button> <button class="btn" data-Index="1" bindtap="doUpload">本地相册</button> </view> </view> -
使用
wx.chooseImage进行图片选择,wx.cloud.uploadFile进行图片上传至云存储wx.chooseImage({ count:1, sizeType: ['original','compressed'], sourceType: [sourceType], success: function(res) { console.log(res) let filePath = res.tempFilePaths[0]; // animal为云开发 存储 中 新建的文件夹名称 const cloudPath = `animal/${Date.now()}${filePath.match(/\.[^.]+?$/)}` console.log(cloudPath); wx.cloud.uploadFile({ cloudPath, filePath, success:res=>{ console.log(res) wx.navigateTo({ url: `../detail/detail?pic=${filePath}&&fileID=${res.fileID}` }) } }) }, }) }, -
新建 node.js 云函数
在 cloudfunctions 下新建一个云函数(注意命名必须唯一),修改 index.js
-
引入云函数入口文件
const cloud = require("wx-server-sdk"); -
引入
baidu-aip-sdk,(使用前先进入此云函数所在目录安装这个包,此处已安装好)var AipImageClassifyClient = require("baidu-aip-sdk").imageClassify; -
设置 APPID/AK/SK
var APP_ID = "your APP_ID"; var API_KEY = "your API_KEY"; var SECRET_KEY = "your SECRET_KEY"; -
新建一个对象,建议只保存一个对象调用服务接口,并初始化 cloud
var client = new AipImageClassifyClient(APP_ID, API_KEY, SECRET_KEY); cloud.init(); -
编写云函数入口函数,使用
cloud.downloadFile下载图片,下载后转为 base64,进而使用client.animalDetect进行图像识别,并将结果返回(附加百科词条)exports.main = async (event, context) => { const { fileID } = event; //通过fileID取这张图片 const res = await cloud.downloadFile({ fileID: fileID, }); const buffer = res.fileContent; let image = buffer.toString("base64"); const info = await client.animalDetect(image, { baike_num: 5 }); return { info, }; };
-
一坑
注意:写好的云函数记得右击上传并部署
-
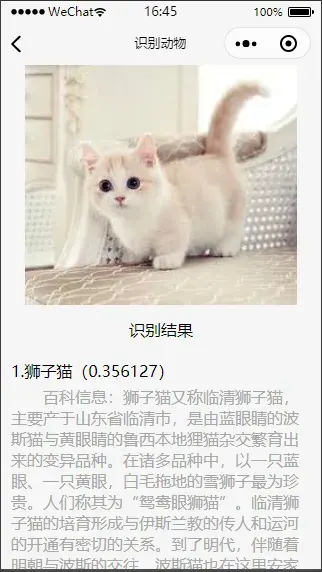
识别结果页面
<view wx:if="{{imgUrl}}"> <image src="{{imgUrl}}" mode="aspectFit"></image> </view> <view class="title-container"> <text class="title">识别结果</text> </view> <view wx:for="{{result}}" class="list"> <view class="list-name">{{index+1}}.{{item.name}}({{item.score}})</view> <view class="list-baike" >百科信息:{{item.baike_info.description || '暂无'}}</view > </view> -
识别页面的入口函数
在文件中使用
wx.cloud.callFunction调用云函数onLoad: function (options) { let { pic, fileID } = options; this.setData({ imgUrl:pic }) wx.cloud.callFunction({ name:"baidu2", data:{ fileID: fileID }, success:res=>{ console.log(res,"baidu") const {result:{info:{result}}} = res this.setData({ result:result }) } }) },
github 地址:https://github.com/xxn-my/applet-cloud
效果图:


二坑
在微信开发者工具打开终端执行 npm install 出现以下的提示
无法加载文件 C:\Users\lulei\AppData\Roaming\npm\cnpm.ps1,因为在此系统上禁止运行脚本”的问题
解决方案
打开 Windows PowerShell,选择“以管理员身份运行”,输入set-ExecutionPolicy RemoteSigned,然后更改权限为 A 即可